
💪 Workout Program
Duration: 4 Weeks | Frequency: 3 sessions/week | Equipment: yoga block, resistance band, foam roller
Day 1: Hip & Ankle Decompression
Day 3: Thoracic Spine & Shoulder Opening
Day 5: Full Body Integration
3-Day Mobility Restoration Program
A 4-week, 3x/week routine designed for Beginner individuals looking to achieve full-body mobility, postural relief, and pain-free movement.
🌟 Why This Program Works (The Benefits)
Most people stretch only after they're already injured — this program flips that approach. Designed by Dr. Sarah Okafor, MD, MSc Sports Medicine, it targets the root causes of modern postural dysfunction: tight hip flexors from prolonged sitting, restricted thoracic rotation from desk posture, and limited ankle mobility that cascades into knee and lower back pain.
Here's what you'll achieve over 4 weeks:
- Reduced lower back pain — by restoring hip flexor length and improving spinal segmental control, the chronic pull on your lumbar spine is released
- Improved posture — thoracic mobility work directly counteracts the forward rounding of the upper back caused by screens and sedentary work
- Greater athletic range of motion — deeper squats, freer hip rotation, and stronger overhead positions become accessible
- Injury prevention — research confirms that active mobility work, not passive stretching alone, reduces soft tissue injury risk by training neuromuscular control at end-ranges
- Better daily function — putting on shoes, reaching overhead, turning to check your blind spot — all improve when joint mobility is restored
- Zero equipment barriers — sessions require only a yoga block, a resistance band, and a foam roller; no gym needed
- Time-efficient results — each session takes 25–35 minutes, making consistency achievable even on a busy schedule
🗓️ Weekly Schedule Overview
This program follows an alternate-day structure to allow your nervous system and connective tissues to adapt between sessions. Do not compress all three sessions into back-to-back days.
| Day | Session |
|---|---|
| Monday (Day 1) | Hip & Ankle Decompression |
| Tuesday | Rest or gentle walking |
| Wednesday (Day 3) | Thoracic Spine & Shoulder Opening |
| Thursday | Rest or gentle walking |
| Friday (Day 5) | Full Body Integration |
| Saturday & Sunday | Full rest or light activity |
Coach's Note: If your schedule requires shifting days, the only rule is: never do two sessions in a row. Recovery is when mobility improvements consolidate.
🏋️ The Workout Routine
Day 1 — Hip & Ankle Decompression
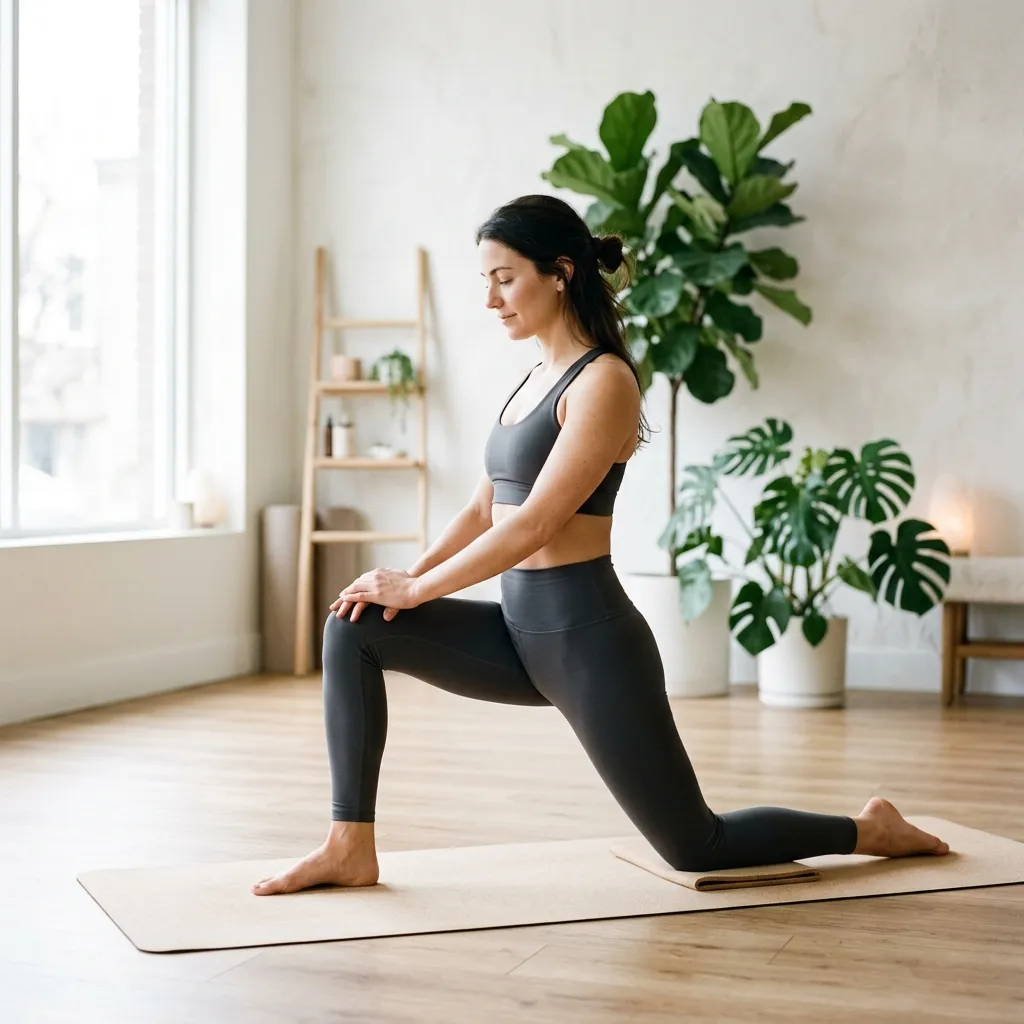
Exercise 1: Half-Kneeling Hip Flexor Stretch
-
Sets & Reps/Time: 3 sets × 45 seconds hold each side
-
How to Do It:
- Kneel on your right knee with your left foot forward, forming a 90° angle at both knees.
- Tuck your pelvis slightly under (posterior pelvic tilt) — this is critical to isolating the hip flexor rather than just hinging at the lower back.
- Drive your right hip gently forward until you feel a stretch in the front of the right hip/thigh.
- Raise your right arm overhead to add a lateral component. Hold for the full 45 seconds.
- Breathe deeply. With each exhale, allow yourself to sink slightly deeper — do not force it.
- Switch sides and repeat.
-
[IMAGE PLACEHOLDER]: A side-angle photo of a person in a half-kneeling position with the rear knee on a yoga mat, pelvis tucked, rear arm raised overhead, with an annotation arrow showing the direction of the hip drive forward. Demonstrate correct pelvic positioning vs. common hyperextended-lower-back mistake.
Exercise 2: Ankle Dorsiflexion Mobilization
-
Sets & Reps/Time: 3 sets × 12 reps each side
-
How to Do It:
- Stand facing a wall about 10–12 cm (4–5 inches) away. Place one foot close to the wall.
- Drive your knee forward over your little toe, attempting to touch the wall with your knee without lifting the heel.
- If your knee easily reaches the wall, move your foot further back 2–3 cm increments until it becomes challenging.
- Return to the start position. Perform 12 controlled reps, maintaining heel contact throughout.
- The goal is range of motion through active control — not speed.
-
[IMAGE PLACEHOLDER]: A front-facing diagram showing the foot-to-wall drill with measurement markers for foot placement. Include a close-up circle annotation of the heel remaining flat on the floor as the key coaching cue.
Exercise 3: 90/90 Hip Swivels
-
Sets & Reps/Time: 3 sets × 10 swivels (5 each direction)
-
How to Do It:
- Sit on the floor with both knees bent at 90° — one knee in front, one to the side (like a figure-four from above).
- Keeping your spine tall, slowly rotate your hips so the front knee becomes the back knee and vice versa, in a smooth "windshield wiper" motion.
- Control the movement through the full range — do not collapse through the spine.
- Pause briefly at each end position and feel the hip stretch before transitioning.
- 1 complete rotation counts as 1 rep.
-
[IMAGE PLACEHOLDER]: An overhead or 3/4 angle sequence showing three positions: starting 90/90, mid-transition, and opposite 90/90 — with arrows indicating the direction of hip rotation. Emphasize the upright spine throughout the sequence.
Exercise 4: Deep Squat Hold (with yoga block if needed)
-
Sets & Reps/Time: 2 sets × 60 seconds hold
-
How to Do It:
- Stand with feet shoulder-width apart, toes pointing out at roughly 30–45°.
- Lower yourself into a full squat position. If your heels rise, place a yoga block or folded towel under each heel.
- At the bottom, use your elbows to gently press your knees outward, widening the hips.
- Keep your spine as upright as possible — hold onto a door frame or TRX strap if needed to maintain balance.
- Breathe steadily and hold for the full 60 seconds. The discomfort should feel like a stretch, never a sharp pain.
-
[IMAGE PLACEHOLDER]: A side-view photo of a person in a full deep squat with heels on a yoga block, elbows pressing knees out, and a tall spine. Annotate the three coaching points: heels supported, knees tracking over toes, chest upright.
Day 3 — Thoracic Spine & Shoulder Opening
Exercise 1: T-Spine Foam Rolling
-
Sets & Reps/Time: 2 sets × 90 seconds gentle rolling
-
How to Do It:
- Place the foam roller perpendicular to your spine, positioned at the mid-back (thoracic region — not the lumbar spine).
- Support your head with your hands interlaced behind your neck. Lift your hips slightly off the floor.
- Slowly roll up and down from the bottom of the shoulder blades to the base of the neck — about a 15–20 cm (6–8 inch) range.
- When you hit a tender area, pause for 5–10 seconds, breathe deeply, and allow the tissue to release before moving on.
- Do not roll the lower back — the lumbar spine lacks the rib cage protection of the thoracic region and can be strained.
-
[IMAGE PLACEHOLDER]: A lateral (side-view) image of a person lying over a foam roller positioned at mid-back, hands supporting the head, hips slightly lifted. Include an anatomical overlay highlighting the thoracic vs. lumbar regions to show the safe rolling zone.
Exercise 2: Cat-Cow Dynamic Transition
-
Sets & Reps/Time: 3 sets × 15 slow transitions
-
How to Do It:
- Begin on all fours — hands under shoulders, knees under hips. Spine in a neutral position.
- Cat phase: Exhale and round your entire spine toward the ceiling, tucking your pelvis and chin toward your chest. Think of pushing the floor away with your hands.
- Cow phase: Inhale and let your belly drop toward the floor, lifting your tailbone and gaze gently upward. Let the movement ripple through each spinal segment.
- Move slowly and deliberately — this is not a speed exercise. Each full cat-to-cow counts as 1 rep.
- Focus on segmental control — try to feel each vertebra participate individually rather than moving as a single block.
-
[IMAGE PLACEHOLDER]: A split-panel diagram showing the Cat position (spine rounded) on the left and the Cow position (spine extended) on the right, with arrow overlays indicating the direction of spinal movement and the breath cycle (exhale for Cat, inhale for Cow).
Exercise 3: Prone Y-T-W Raises
-
Sets & Reps/Time: 3 sets × 10 reps each letter (Y, T, W performed consecutively)
-
How to Do It:
- Lie face down on a mat with your forehead resting on a rolled towel or the edge of a bench.
- Y Raise: Extend arms overhead at roughly 30° from center (like the letter Y). With thumbs pointing up, lift both arms off the floor as high as possible, squeezing the mid-back muscles. Hold 1 second at the top, lower with control.
- T Raise: Extend arms straight out to the sides (like the letter T). With thumbs pointing up, lift both arms. Hold 1 second. Lower.
- W Raise: Pull your elbows toward your hips in a "W" shape, driving the shoulder blades together and down. Hold 1 second at peak contraction. Lower.
- Use no weight initially. These movements are harder than they look — quality matters far more than range.
-
[IMAGE PLACEHOLDER]: A three-panel overhead photo sequence showing the Y, T, and W arm positions from behind, with the person lying prone. Annotate the direction of the shoulder blade motion (retraction and depression) with arrows for each position.
Exercise 4: Thread the Needle
-
Sets & Reps/Time: 3 sets × 8 reps each side
-
How to Do It:
- Start on all fours — hands under shoulders, knees under hips.
- Raise your right arm toward the ceiling, rotating your thoracic spine and opening your chest to the right. Follow your hand with your gaze.
- Reverse: thread the right arm underneath your left arm along the floor, allowing your right shoulder and ear to rest on the mat. Your left arm stays extended for support.
- Return to the starting position. That is 1 rep.
- The rotation should come from the thoracic spine — try to keep the hips level and stable throughout.
-
[IMAGE PLACEHOLDER]: A side-by-side comparison showing the "open" position (arm rotated toward ceiling, chest facing sideways) and the "threaded" position (arm swept under, shoulder on floor), with a stability annotation on the hips to show they should remain level.
Day 5 — Full Body Integration
Exercise 1: World's Greatest Stretch
-
Sets & Reps/Time: 3 sets × 6 reps each side
-
How to Do It:
- Begin in a high plank position.
- Step your right foot outside your right hand into a lunge position.
- Drop your left knee to the floor (optional, for beginners).
- Rotate your right arm toward the ceiling, opening your chest and following with your eyes. Hold 2 seconds.
- Return the right hand to the floor, then tuck your right foot back to plank.
- Repeat on the left side. That is 1 full rep.
- The movement should feel like a flowing sequence — lunge, open, rotate, return.
-
[IMAGE PLACEHOLDER]: A four-frame sequence showing: (1) plank start, (2) foot stepping outside hand into lunge, (3) arm rotating toward ceiling with full thoracic rotation, (4) return to plank. Emphasize the rotation height in frame 3 as the key range-of-motion indicator.
Exercise 2: Down Dog to Cobra Flow
-
Sets & Reps/Time: 3 sets × 10 dynamic flows
-
How to Do It:
- Begin in Downward Facing Dog — hips high, heels pressing toward the floor, spine long.
- Inhale: shift your weight forward and lower your hips toward the floor, allowing your chest to open forward into Cobra position (arms straight or slightly bent, shoulders away from ears).
- Exhale: push back up into Downward Dog, driving your hips up and back.
- The transition should be smooth and breath-driven — inhale forward to Cobra, exhale back to Down Dog.
- 1 complete cycle (Down Dog → Cobra → Down Dog) = 1 rep.
-
[IMAGE PLACEHOLDER]: A side-view two-panel image: left panel shows Downward Dog (inverted V shape, hips elevated); right panel shows Cobra (hips low, chest forward, spine extended). Annotate breath direction (inhale arrow pointing toward Cobra, exhale arrow toward Down Dog).
Exercise 3: Cossack Squat (Assisted)
-
Sets & Reps/Time: 3 sets × 8 reps each leg
-
How to Do It:
- Stand with feet wide apart — roughly 1.5–2x shoulder width — toes turned out slightly.
- Hold a door frame, TRX strap, or resistance band anchored at waist height for balance support.
- Shift your weight to the right leg, bending the right knee deeply while keeping the left leg straight with the left foot flat (or toes up).
- Lower until your right thigh is parallel to the floor (or as deep as your mobility allows). Keep your chest upright.
- Drive through the right heel to return to center, then shift to the left side.
- This targets hip adductor length, glute strength, and ankle mobility simultaneously.
-
[IMAGE PLACEHOLDER]: A front-facing photo showing the deep lateral squat position — right knee bent and tracking over toes, left leg extended, chest tall, hands holding support at chest height. Add a range-of-motion annotation arrow showing the goal depth for weeks 1–2 vs. weeks 3–4.
Exercise 4: Passive Dead Hang
-
Sets & Reps/Time: 3 sets × 30–45 seconds
-
How to Do It:
- Grip an overhead bar with both hands, slightly wider than shoulder width. A pull-up bar, sturdy doorframe bar, or playground equipment all work.
- Let your entire body weight decompress your spine — do not engage your shoulders actively; allow them to passively rise toward your ears.
- Breathe slowly and deeply. With each exhale, let your body sink a little further.
- If 30 seconds feels uncomfortable, start with feet lightly touching the floor (assisted hang) and progress to a full hang as grip strength develops.
- If your grip fails before the time is up, stop — do not strain to hold on. Grip strength will improve week by week.
-
[IMAGE PLACEHOLDER]: A full-body photo of a person hanging passively from a bar — shoulders relaxed upward (shrugged), spine long, feet just off the floor. Include a contrast inset showing "active hang" (shoulders depressed, wrong for this exercise) vs. "passive hang" (shoulders relaxed, correct).
💡 Progression & Pro-Tips
How to Progress
This program uses neural and range-of-motion progression, not load progression. Follow this weekly guide:
| Week | Focus |
|---|---|
| Week 1 | Learn the movement patterns. Use your yoga block freely. Prioritize breath control over range of motion. Expect tightness. |
| Week 2 | Extend hold times by 5–10 seconds on static holds. Begin pushing to a slightly deeper range of motion on each movement — only if pain-free. |
| Week 3 | Remove the yoga block where possible in the Deep Squat. Attempt unassisted Cossack Squats. Add 2 extra reps to each dynamic exercise. |
| Week 4 | Full program without modifications. Challenge yourself to reach end-range on every movement. Consider adding an optional 4th session as an active recovery day using Days 1 and 3 exercises only. |
Coach's Notes from Dr. Sarah Okafor
On breathing: This is the single most underrated tool in mobility training. Exhaling fully — especially into a static hold — activates the parasympathetic nervous system, which signals the muscles to relax. Do not hold your breath during holds; it keeps the nervous system in a guarded state and limits your range of motion.
On pain vs. discomfort: Discomfort is a productive stretch sensation — a dull pulling, mild heat, or awareness of tissue length. Pain is sharp, shooting, or localized to a joint. If you feel genuine pain in any exercise, stop immediately, reduce the range, and consult a physiotherapist before continuing.
On the dead hang: Many people skip this exercise because it looks too simple. Don't. The passive hang provides approximately 15–25 mm of spinal decompression per session — clinically relevant for people with compressed discs, shoulder impingement, or chronic neck tension. It is one of the highest-value movements in this entire program.
Common mistake to avoid: Rushing through static holds. The physiological adaptation in connective tissue (tendons, fascia, joint capsules) occurs over time under tension — not repetitions. If you're bouncing in and out of stretches in under 20 seconds, you are not creating the mechanical stimulus for lasting change.
This program was designed by Dr. Sarah Okafor, MD, MSc Sports Medicine. Always consult a qualified healthcare professional before beginning a new exercise program, especially if you have pre-existing joint pain or injury.
Frequently Asked Questions
No. You should feel a mild, comfortable stretch or dynamic pull, but never sharp, shooting, or pinching pain. If a movement hurts, decrease the range of motion or consult a professional.
Yes, this program is perfect as a warm-up. It wakes up stabilizer muscles and increases range of motion. Only do 1 set of each exercise if using it as a pre-workout warm-up.